Hi there!I've finally decided to start my arts blog - if only as a means for me to show off my projects and give out the patterns for knitting that i may come up with.
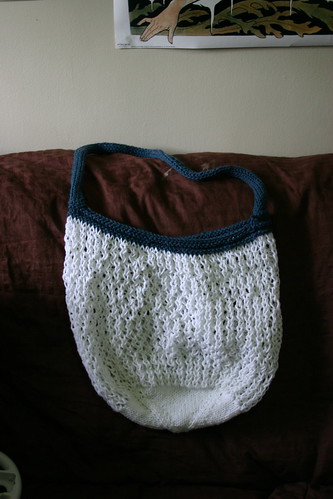
Today's project is a small bag that can be used as a shoulder bag, as a travel case for toiletries, or whatever else you could use a small bag for.
[note: i never read patterns, just make them, so my apologies if the instructions are a little confusing. once i get the hang of this it'll get better, i swear.]
materials:
- 1 ball hemp wool (any wool will work for this bag); the thicker the yarn, the bigger the bag
- 2 dpns & 1 circular needle OR// 5 dpns (once again, the bigger the needles, the bigger the bag; just be sure that the needles aren't too big for the wool, or you will have gaps in your bag)
- optional: embroidery thread
flap:
- starting with the flap, cast on 36 stitches. for a larger bag, cast on more stitches as necessary.
- this bag can be done in any stitch, but to add decoration to a plain bag i added two stripes of box stitch to the flap
middle/bag
- knit down until the flap is about 4" long, or long enough to cover the top of the bag when buttoned.
- if using a circular needle, switch the stitches on the flap onto the circular needle
- cast on 52 stitches on the circular needle. OR// cast on 8, 36, 8 to the dpns.
- knit around until the bag is as deep as you want it.
- do not cast off
bottom
- on the same side as the flap, knit across 36 stitches
- on the 2nd row, merge the first and last stitches with the first stitch on the sides of the bag (knit them together).
- repeat 8 times or until the front and back meet & there are 36 stitches on either side.
- merge/knit together the remaining stitches until there are only 36 stitches and the bottom is closed.
- cast off.
optional pieces:
the strap: there are different ways to do the strap...examples are braiding, knitting, using ribbon/fabric/etc, be creative!
decoration: i added embroidery thread to parts of the bag to give it colour and make it more decorative. tinsel also looks cool.
lining: make your bag stronger by sewing in some material to line the inside of the bag.
and that's it! i finished this in about a day; it's a relatively easy project - most beginners could handle this.
if you do try this, i'd love to see how it turned out and how you made it your own! post pictures in the comments box.