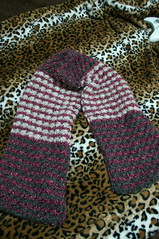
i finished the scarf on the drive to Montreal last weekend.
took me only 2 days to knit, which i'm rather proud of.
Thursday, December 3, 2009
Wednesday, November 25, 2009
super stars infinity scarf
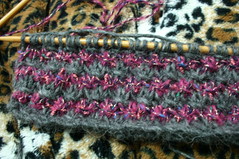
i decided to do something basic, but pretty for my mom for christmas.
I decided to use a two-colour star stitch, which i think looks really cool.
i plan on switching the charcoal every 10 rows between charcoal, cream, and maroon & keep the sparkly red on every other row.
I decided to use a two-colour star stitch, which i think looks really cool.
i plan on switching the charcoal every 10 rows between charcoal, cream, and maroon & keep the sparkly red on every other row.
Tuesday, November 24, 2009
"Thanks Grandma..." - the ugliest, yet most awesome winter hat.

wow it's been awhile since i've posted. anyone who's been to my Ravelry page will know that i've been pretty busy...and i haven't even posted all my photos up there yet. and now onto the real post...
Remember those horribly ugly toques your grandmother or some other member of your family used to knit for you? with the big pompom on top and some lame or ugly design...or, god forbid, your name on it...and out of respect, or the threats of your parents, you were forced to wear at least once just to make them happy.
although they seemed really uncool to wear as kids, i have developed an endearing sentiment towards certain ugly things.
I decided this week that i was going to combine a old, ugly toque design with the slouchy beret designs that have become popular recently. I came up with a really easy to do pattern that took me only a few hours to knit.

i would like to note that although the pattern for the hat is my own making, the snowflake design is not mine, and can be found here: http://personal.smartt.com/~brianp/snowflake.html
sometime this week i will be posting images and letter designs of my own for other hats.
gauge: 4.5 sts x 6 rows = 1"
for this you will need:
- medium weight wool; 1 ball of Main colour (MC), 1 ball for each other colour you plan on using (CC1,2).
- five 4mm dpns, or 4mm circular needle
- a cd or dvd case
brim;
body;
decrease
repeat until there are 4 sts. remaining.
Cut string, and pull it through the remaining sts.
pull tight and tie it off.
Pompom photos below


Monday, August 31, 2009
Hello world!
Here's this week's update on my projects:
knitting wise
media wise:
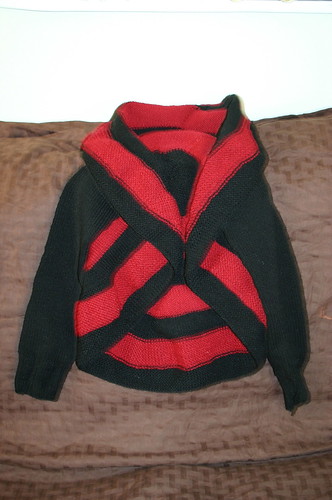
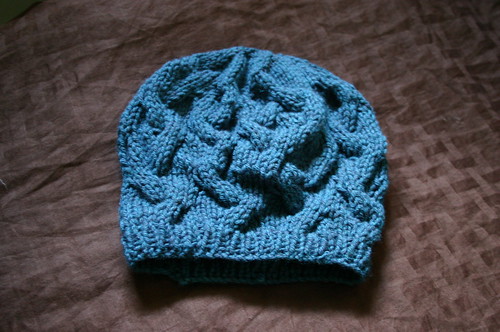
and here are the photos of the sweater and hat i mentioned in the previous post:
Here's this week's update on my projects:
knitting wise
- started & finished a set of baby booties in one day (mega cute)
- started the OP art baby blanket in grey and black; I'd say it's about 1/5 done.
- a friend has asked me to make 4 toques for her bridesmaids as gifts
- I've decided to make myself a bright purple capelet for the fall, as it's already starting to get cold outside. I've found a very simple but nice pattern so i'm going to start it tonight.
media wise:
- redoing a photos page on a pre-existing website
- met a 'manager' for a local band; he's supposed to be emailing me about tshirt designs this week.
- working on a website for one of my APs at work.
and here are the photos of the sweater and hat i mentioned in the previous post:
Wednesday, August 19, 2009
So the booties are done (i found a great pattern on ravelry that's quick, easy and looks super cute) - i'm considering adjusting the pattern to fit my foot so that i can have some warm slippers this winter...that and i wanted to make a pair of shoes out of the hemp wool i bought and some soft leather. If that works out i will post the pattern for it on here, as well as on Ravelry.*
I started the baby blanket for my sister yesterday; it's a good thing she isn't due until february, because i know i will get bored of this pattern and put it down a few times. it's very repetitive - kbf the first stitch, k to end of section through the whole blanket...*yawn*
I swear i won't post on here again until i get some photos of the 3 projects i just finished (pinwheel sweater, floppy poorboy hat, black straps baby booties), or until i have a new pattern to post.
*for any readers that might be on Ravelry, my username is Soup-a-doopa
Monday, August 17, 2009
soon to be knitting waaay more.
Well, I finished my pinwheel sweater as well as a floppy beret this weekend (pictures later)!
I had planned to start on the Space Invaders sweater next, but it seems my oldest sister is pregnant with her first kid, so i should probably start making the baby blanket and booties i told myself i would make for my sisters when they had kids. I want the blanket to be in an Entrelac pattern, so i should get started soon...it's just a matter of whether she knows the sex, or if i'm making stuff in unisex colours.
In other news i'm getting a lot of orders in; 5 toques for a wedding party's gifts, a couple slouchy beret's, the SI sweater for agata, and then of course my "i <3 zombies" sweater...I think i might attempt to make a felted bag/purse because i think with the right pattern i could sell a few of them.
...It's a good thing i'm really ambitious when it comes to knitting because when i write it all out, i have a hell of a lot of knitting to do.
Sunday, June 28, 2009
Thursday, June 25, 2009
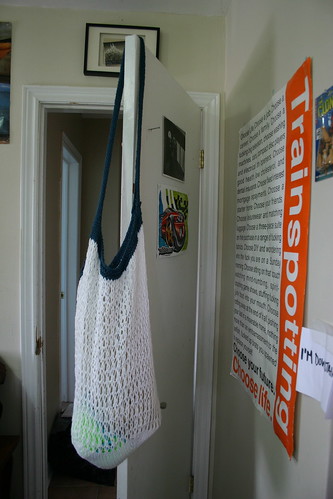
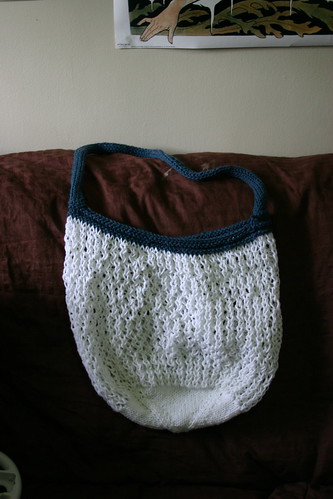
Hemp Rainbow Shoulder bag


Hi there!
I've finally decided to start my arts blog - if only as a means for me to show off my projects and give out the patterns for knitting that i may come up with.
Today's project is a small bag that can be used as a shoulder bag, as a travel case for toiletries, or whatever else you could use a small bag for.
[note: i never read patterns, just make them, so my apologies if the instructions are a little confusing. once i get the hang of this it'll get better, i swear.]
materials:
- 1 ball hemp wool (any wool will work for this bag); the thicker the yarn, the bigger the bag
- 2 dpns & 1 circular needle OR// 5 dpns (once again, the bigger the needles, the bigger the bag; just be sure that the needles aren't too big for the wool, or you will have gaps in your bag)
- optional: embroidery thread
flap:
- starting with the flap, cast on 36 stitches. for a larger bag, cast on more stitches as necessary.
- this bag can be done in any stitch, but to add decoration to a plain bag i added two stripes of box stitch to the flap
middle/bag
- knit down until the flap is about 4" long, or long enough to cover the top of the bag when buttoned.
- if using a circular needle, switch the stitches on the flap onto the circular needle
- cast on 52 stitches on the circular needle. OR// cast on 8, 36, 8 to the dpns.
- knit around until the bag is as deep as you want it.
- do not cast off
bottom
- on the same side as the flap, knit across 36 stitches
- on the 2nd row, merge the first and last stitches with the first stitch on the sides of the bag (knit them together).
- repeat 8 times or until the front and back meet & there are 36 stitches on either side.
- merge/knit together the remaining stitches until there are only 36 stitches and the bottom is closed.
- cast off.
optional pieces:
the strap: there are different ways to do the strap...examples are braiding, knitting, using ribbon/fabric/etc, be creative!
decoration: i added embroidery thread to parts of the bag to give it colour and make it more decorative. tinsel also looks cool.
lining: make your bag stronger by sewing in some material to line the inside of the bag.
and that's it! i finished this in about a day; it's a relatively easy project - most beginners could handle this.
if you do try this, i'd love to see how it turned out and how you made it your own! post pictures in the comments box.
Subscribe to:
Posts (Atom)